Showing posts with label camouflage. Show all posts

Friday, 27 May 2022

Winter Camo

 "Engineering Forces Staff
33rd Army
February 28th, 1942
#0391

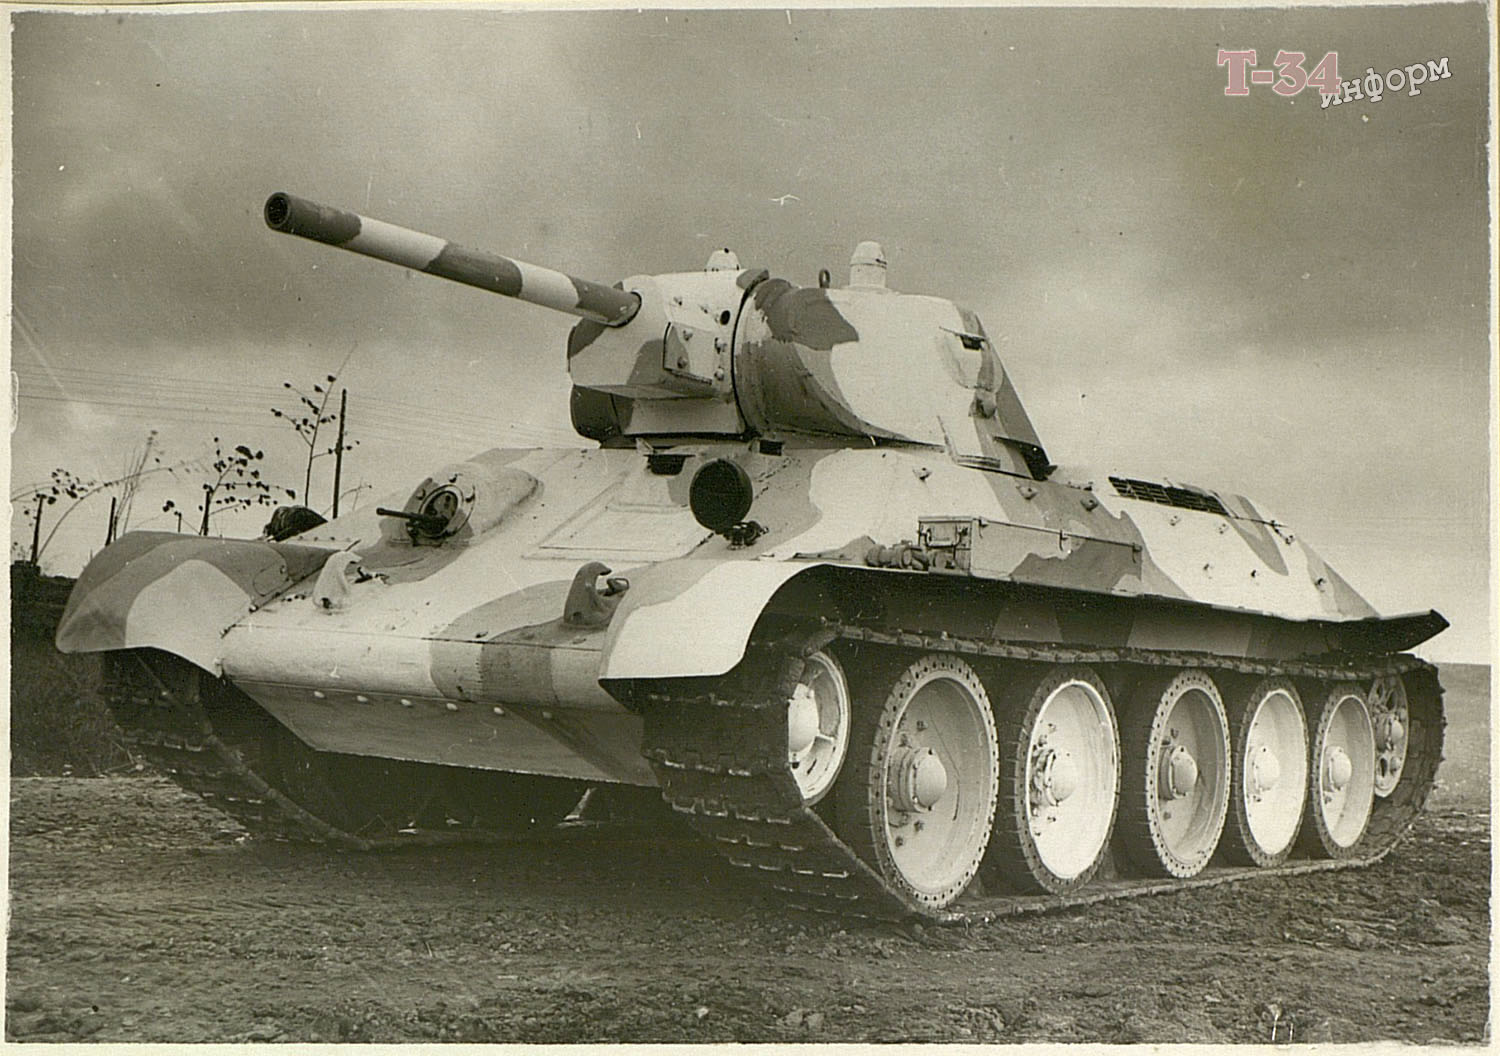
I send you samples of winter camouflage that gave the best result in forested areas during proving grounds trials for a tank, a cannon, and a car.

Apply similar paint in units in order to establish effectiveness in fighting conditions.

Report on results of observing painted vehicles and report by March 10th, 1942.

Chief of Staff of the Engineering Forces, 33rd Army, Lieutenant Colonel [signature]
Major [signature]

Brief instructions on a new winter camouflage pattern

White paint available on the front lines is applied over top of summer protective green. A part of the hull (about 50-60%) is covered in large white spots. The rest is covered in 1-2 cm wide stripes that create a mesh with cells 4x4 cm to 15x15 cm in size. Apply the stripes by hand. It is not necessary to keep the lines straight and the cells the same size.

Examples for painting tanks, cars, and an anti-tank gun shield are attached.

Wednesday, 22 December 2021

Winter Camo

"November 27th, 1944
#524909

According to an order of the Commander of the Armoured and Mechanized Forces, imported tanks that arrive in military acceptance departments in winter time are painted in white winter camouflage.

Tanks are then transferred to training regiments where the guns are tested and the tanks are used to train crew cohesion.

Experience from last winter showed that the camouflage is wiped off the tanks during firing and training, and the regiments are forced to paint the tanks again, which expends an excess of labour and paint.

I ask you to order the commanders of the 16th and 27th Independent Training Tank Regiments to request unpainted tanks from the GBTU Tank Directorate. Paint the tanks in the regiments before they are sent to the front.

Inform me of your decision

Deputy Chief of the GBTU Tank Directorate, Engineer-Colonel Muravich
Chief of the 5th Department of the GBTU TU, Engineer-Major Biletkin"

CAMD RF F.38 Op.11355 D.2190 L.254
Printed in Glavnoye Bronetankovoye Upravleniye Lyudi, Sobytiya, Fakty v dokumentakh, 1944-1945 p.229

Monday, 6 September 2021

Soviet Camo that Came Too Late

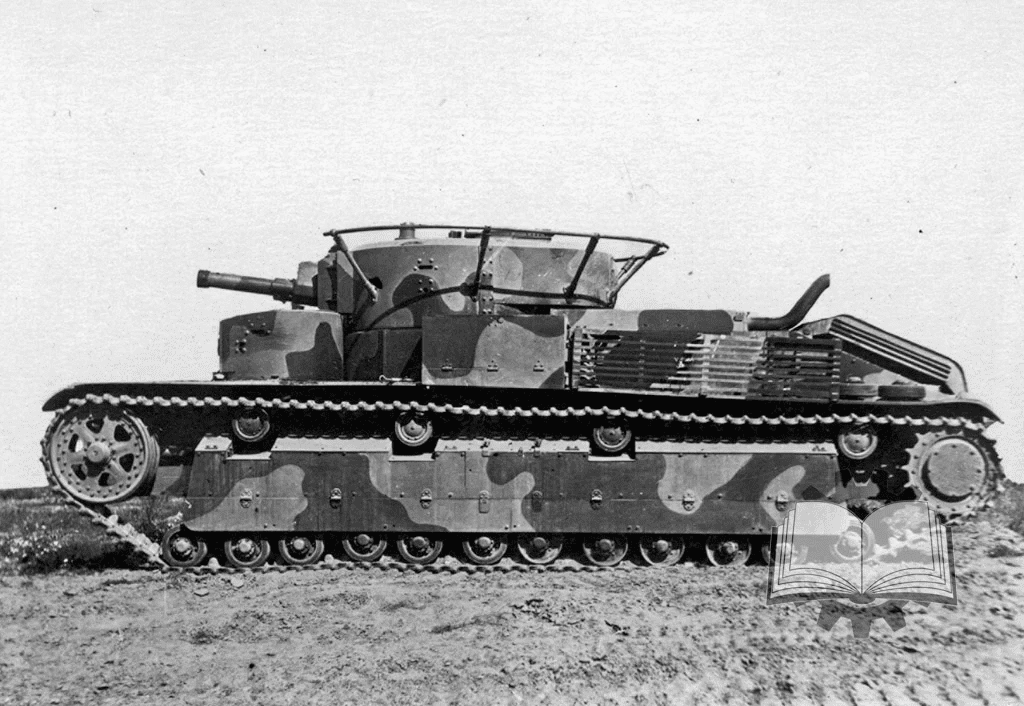
The appearance of tanks on the battlefield in September of 1916 quickly forced many to reconsider some preconceived notions about their use. The first to make changes were the British, who pioneered the concept on the battlefield. The pair of wheels that aided in turning the tank was quickly dropped. There were two other important changes: one was the use of fascines and logs for crossing obstacles, the second was camouflage. WWI marked a turning point in the use of camouflage. Previously uniforms were bright and colourful, but now being hidden was very important. Camouflage was used in uniforms, artillery, and military vehicles. This did not mean that camouflage would entirely displace single tone paint schemes, but tanks were repainted soon after they were involved in their first battles. The use of camouflage decreased after the end of WWI. Most major tank building nations dropped the idea of widespread camouflage, with the exception of the French, who kept on using it. The Germans also returned to three colour camo in the late 1920s. A second wave of camouflage swept through all nations in the mid-1930s. Some tanks remained in camouflage at the start of WWII, but the Germans dropped it, moving from Feldgrau Nr.3 (don't be misled, this is actually a shade of olive green) and then black-gray RAL 70121 as the base coat.

A T-28 tank with three colour camouflage developed for the Middle Asian Military District, summer of 1939.

Friday, 20 August 2021

Winter Camo


 "GABTU Scientific Research Proving Grounds

Approved:
Proving Grounds Chief Colonel Romanov, December 15th, 1941

Approved
Proving Grounds Commissar, Regimental Commissar Dolgov, December 16th, 1941

Conclusions regarding experimental winter camouflage of armoured vehicles

Introduction

On orders from the GABTU, T-34, T-50, BT, T-26, and T-40 tanks were painted in winter camouflage patterns between September 19th and October 2nd, 1941. The trials were performed at the GABTU proving grounds.

The goal of the trials was to:

  1. Establish the pattern that was the most effective at breaking up the outline and shape of the tanks.
  2. Establish the shade of colours that blend together with the surroundings in winter.
  3. Develop a formula for paint that is sufficiently resilient and easy to produce.
After the pattern, colour, and formula are selected, the proving grounds will apply it to samples of all vehicles used by the Red Army. After experimental camouflage is applied, an instruction manual on winter painting will be composed and requirements will be distributed to factories.

Thursday, 3 September 2020

Stars and Stripes

"Identification markings for ground forces, tanks, armoured cars, and armoured vehicles of the Central Front

Thursday, 20 August 2020

New Look of the Central Front

"May 18th, 1943
Armoured and Mechanized Forces of the Central Front

Distinguishing markings of the Armoured Forces of the Central Front

A: Land forces (daytime), tanks and armoured cars

Thursday, 6 August 2020

Tank Identification

"Identifying signs of tanks and armoured cars of the Armoured and Mechanized Forces of the Central Front
June 1st to June 15th, 1943

For ground forces, tanks and armoured cars


Day:
Main: solid white stripe along the top of the turret (white paint or chalk), 15-20 cm tall.
Secondary: three green flares towards friendly forces

Night:
Main: the daytime secondary signal.
Secondary: raising and lowering a lit lamp from the partially opened top turret hatch up to three times.

Chief of Staff of the Armoured and Motorized Forces of the Central Front, Korobkov
May 25th, 1943"

CAMD RF F.62 Op.321 D.16 L.117

Wednesday, 11 March 2020

Tanks and Air

"Orders to the 4th Tank Army #019
July 24th, 1943

The Army Commander orders that:

Friendly identification markings for aircraft consist of:
  1. For cabins of trucks and turrets of tanks: a white triangle at the top, as large as possible.
  2. Motorized rifle units mark the front line with white strips of fabric.
  3. When our aircraft are seen, immediately fire green-red flares and a burst of tracers towards the enemy.

Wednesday, 10 July 2019

Gun Maskirovka

The art of concealment and camouflage was incredibly important for anti-tank gun crews. One position was also not enough: it was necessary to prepare multiple positions, concealment for the crew in case of indirect fire against the gun, storage of ammunition, etc. Diagrams were produced in order to make it easier to see what had to be done.

Wednesday, 16 May 2018

Hide Your Guns

The need to hide artillery appeared long ago, but the military took development of camouflage paint schemes seriously only on the cusp of the 19th and 20th centuries. Progress in observation methods and increased movement of all sorts of forces played an important role. Widespread use of firearms and the introduction of aircraft dispelled the romantic notion of tight formations and colourful uniforms. There was a sudden need to quickly hide equipment, especially large equipment such as tanks, guns, and automobiles, but not at a cost to mobility. How did the Red Army deal with camouflage during the Great Patriotic War?

Monday, 24 October 2016

How to Paint Camo Spots

Just like the Americans, the Red Army had very specific instructions about how to paint camouflage patterns on tanks, down to directions on painting individual spots. The spots had to have a wiggly outline and vary in shape and size in order to disrupt the outline of the vehicle by concealing distinctive features such as corners or straight lines. Spots should not be painted in parallel with any edges. Similarly shaped spots of the same colour should not be positioned symmetrically.

Wednesday, 20 July 2016

Pre-War Ambush Tactics

"Tank Ambush
From our special correspondent

The Blue forces forded the Volma river and penetrated the front lines of the 37th Infantry Division, fighting for the Red side. Their front lines relentlessly pushed forward, supported by powerful artillery and a large amount of tanks, developing success in depth.

However, the penetration of the "enemy" defenses does not mean victory. Usually, the defender builds a defense in depth with several lines. In this case, the commander of the 37th had two battalions in reserve at that section of the front. In addition, the attached tank unit was also in the division commander's reserve.

Wednesday, 20 April 2016

Markings

Stereotypically, Soviet tanks drive into battle plastered with red stars, the more the merrier. Realistically, the system of identification markings was a little bit more complicated. For instance, here's an order that's sure to excite any scale modeler with the variety of options it provides:


Variant
Infantry, artillery, cavalry, and other units
Tank and mechanized units
1
Day: an angle made from white material, corner towards enemy.
Night: yellow flare in the direction of the enemy.
Day: white circle on the turret or cabin, 26 cm in radius.
Night: yellow flare.
2
Day: Arrow made from white material towards enemy.
Night: green flare towards enemy.
Day: white square on the turret or cabin with 60 cm sides.
Night: green flare towards the enemy.
3
Day: letter П made from white material, top towards the enemy.
Night: red flare towards the enemy.
Day: white equilateral triangle with 60 cm sides on the turret or cabin.
Night: red flare towards the enemy.
4
Day: letter T made from white material, top towards the enemy.
Night: green flare towards the enemy.
Day: white rectangle, 40 cm by 60 cm, on the turret or cabin.
Night: green flare towards the enemy.

Variant #1 is active on September 2nd, 3rd, 12th, and 13th.
Variant #2 is active on September 4th, 5th, 10th, and 11th.
Variant #3 is active on September 6th, 7th, 14th, and 15th.
Variant #4 is active on August 31st, September 1st, 8th and 9th.

Tuesday, 1 March 2016

2nd Tank Army Markings

The following markings were ordered for elements of the 2nd Tank Army, in effect on October 1st, 1943.

Markings for army command units, 3rd Tank Corps, 16th Tank Corps, and 11th Guards Independent Tank Brigade

Markings for the 3rd Tank Corps: on the side of a tank turret (50th Tank Brigade, 13th tank), side of a wheeled vehicle (50th Tank Brigade) and front of a wheeled vehicle.

The markings were to be applied to all vehicles of the army, in white paint during the summer and yellow paint during the winter. There were two sizes of markings, a large one for tanks and sides of wheeled vehicles, and a small one to be painted on right side of the windshield.

Size of a large marking:
  • Circle diameters: 90 mm
  • Width of the line: 30 mm
  • Length of the line: 50 mm
  • Height of the numbers: 100 mm
Size of a small marking:
  • Circle diameters: 30 mm
  • Width of the line: 15 mm
  • Length of the line: 150 mm
  • Height of the numbers: 30 mm
Each tank unit was assigned a range of numbers to be used for their tanks. Each unit also got one number to use for their wheeled vehicles.

Friday, 27 November 2015

Friend or Foe

"April 20th, 1945
10:00

Urgent
Important

To all commanders of formations, units, and squads
Stavka directive #11073

Due to the possibility of a meeting between Soviet and Anglo-American forces in the near future, an agreement with Allied Command was reached regarding identification of Soviet and Anglo-American forces:
  1. Soviet forces (infantry, tanks, aviation) identify themselves with a burst of red signal flares. In addition to flares, Soviet tanks are marked with a white stripe on the side turret and a white cross on top. The stripe and cross must be 25 cm wide. Do not apply these markings to all tanks, but only leading ones that are most likely to encounter English or American forces.
  2. Anglo-American forces (infantry, tanks, aviation) identify themselves with a burst of green signal flares. In addition to flares, Anglo-American tanks are marked with yellow or cherry red fluorescent plates at night and a white five-point star in a white circle on horizontal surfaces of the tank.
  3. Soviet and Anglo-American aircraft are identified with national markings aside from the established flare signals.
I. Stalin."

"April 23rd, 1945
12:15

Chief of the General Staff directive #11075

Insignia used by Soviet and Anglo-American forces to identify themselves established by Stavka directive #11073 have been compromised. Starting on April 23rd, the following signals will be used:
  1. Soviet forces (infantry, tanks, aviation) identify themselves with a burst of white signal flares. In addition to flares, Soviet tanks are marked with white triangles on the left and right side of the turret, and the turret roof.
  2. Anglo-American forces use the same signals as before.
Antonov."

Saturday, 14 November 2015

World of Tanks Armoured Fantasy: Tracked Amphibians

The ancient Russian prince Oleg put his ships on wheels and raised their sails when he attacked Constantinople in 907. This shows the age of the idea of combat vehicles that can move both on sea and on land.

Amphibious tanks appears only several years after regular tanks. By the start of WWII, they were widespread among all large tank-building nations. Among many projects were those which would never see the light of day, as experts considered them to be little more than fantasy, such as these three.

Blyamka's Amphibious Tachanka

On August 4th, 1942, the chief of the 3rd department of the NKVD, Major Rogov, received a memo. Attached was a blueprint of an unusual fighting vehicle. The blueprint's author was a Polish POW, Josef Yanovich Blyamka. "The proposed "mechanical tachanka" is an amphibious tankette with good aerodynamic qualities, high speed, mobility, and off-road performance, armed with two machineguns with a 2-3 man crew."

Blyamka pointed out that his vehicle was effective during offensive as well as defensive actions. The author also pointed out that his "mechanical tachanka" could fight in areas covered in hamful chemicals. "It is air-tight and air is only delivered through special anti-chemical windows".

Blyamka did not compose a more detailed description, and only listed a few tactical-technical specifications. They were translated from Polish, and were not always understandable. The armour was to be 10 mm thick, and be equipped with "a rubber cover" (presumably a liner). A "wheel ribbon" presumably meant the tracks.

The hull of the "mechanical tachanka" was to be aerodynamic. With a length of 5.1 meters, Blyamka estimated the height to be 0.6 meters. More likely, it would have been about a meter, which is still very low. Sadly, no decisions were made regarding this design, or they did not survive to this day.

Vetchinkin's armoured motorboat

Another project from 1942, but on a completely different level of quality. Its archive folder is covered in secret stamps from GABTU and the Artkom. The project was indexed "tracked amphibious motorboat GKA-1500". It was designed by a group headed by professor N.S. Vetchinkin, the inventor and designer of various other amphibious vehicles.

The description started like so: "The GKA-1500 uses an armoured floating hull... 8 large hollow buoyant wheels, with a tank-type torsion bar suspension... Steel cable tracks with paddles... The tracks propel the vehicle through water along with the engine." The number was derived from the combined horsepower of the vehicle's engines: 1500 hp.

Vetchinkin based his work on that of American designer Albert Hickman. Thanks to its parallel sides and curved bottom, it had good stability and seafaring characteristics. The hull was placed on tracks, a portion of which was equipped with paddles. The submerged half of the tracks "becomes a rowing implement and, hanging in the water, acts as a large diameter paddle-wheel. The vehicle also had propellers on the rear. The buoyant wheels would paddle water towards them, which would decrease the GKA-1500's initial setting.

The 17-ton amphibious motorboat was supposed to reach a speed of 50 kph on water and three times that on land. The fuel reserves were enough for 4 hours at full speed of 8 hours in economy mode.

The hull was 9 meters long, the width was 2 meters, and 3.1-3.2 meters with tracks. With the gun turret, the vehicle was 3 meters tall. A crew of 20 would fit into this volume.

What tasks was the GKA-1500 meant for? Coast guard and landing operations. Vetchinkin wrote "The ability to take a military craft from the water to the shore, move independently on land, and leave back into the water, combined with a high speed and the ability to fire on the move, like a land tank, gives a very noticeable advantage to a navy... when fighting an enemy that does not have similar vehicles."

However, the military component of the project was not thought through at all. The armament of the vehicle was not specified in the description. The only thing mentioned about armour was that its thickness would have the sacrificed for buoyancy. It's likely that Vetchinkin decided that if the military accepts his chassis, then the armament and protection would be their problem. However, the Commissariat of Defense did not see a need in the GKA-1500, and its blueprints settled down in the archives.

Tanks on ice

Perhaps the most interesting idea for the use of armoured vehicles on rivers was proposed shortly before the start of the Great Patriotic War, in the spring of 1941. Even its origins were unusual: the papers arrived to the General Staff from the directorate of north-eastern labour camps. The author was a prisoner of camp #4, engineer Evsey Lvovich Zelinskiy. His proposal was titled "use of ice floes to organize a tank campaign deep into the enemy rear, by camouflaging tanks as sheets of ice".

Zelinskiy proposed that tanks be placed in massive ice crystals ("ice cabins"). The author wrote: "The walls of the ice cabin would be reinforced with wood to retain integrity after collisions". These designs were equipped with propellers powered by the tanks themselves. The tank engines were supposed to run inside the artificial icebergs.

Zelinskiy explained that since it's impossible to navigate rivers with amphibious tanks during ice drifts, there would be no hazards in the way of the tanks other than natural ones. "Even if the enemy knows that tanks are hidden in the ice, he cannot organize an artillery barrage large enough to destroy all the ice." The tankers would receive heated air inside the "ice cabins". The author was sure that the crew could remain inside the ice indefinitely.

The response to Zelinskiy's proposal from the Bureau of Inventions did not survive to this day. The engineer himself was rehabilitated by the Supreme Court of the USSR. Information on his "ice garages" was only found in the archives recently.

Original article available here.

Friday, 13 November 2015

AA Gun Camo Umbrella

Here's an interesting little gizmo I found a manual for, a camouflage "umbrella" for 85 and 76 mm AA guns. It allows you to keep your gun position covered up while still being able to shoot at aircraft.

Here's a diagram of the frame. It looks like two half-parasols with 3200 mm long spokes. The two halves are connected in the middle, as well as to the gun mount.


Crew installing the camouflage net. A standard net with 5 cm by 5 cm cells with green or white fabric patches is pulled over the spokes. Rope is used to hold together the camo net around the opening where the barrel of the gun is supposed to elevate.


After installation (top) the net is covered in additional camouflage material such as branches or straw (bottom). 


The gun can fully elevate through the opening in the camo net and rotate freely. The camo net can be set up in 50-60 seconds and removed in 15-20 seconds by a well trained crew.

Monday, 15 December 2014

Tank Camouflage and Concealment Rules

The rules for how to camouflage your tank are a pretty frequently visited topic, but this article by Engineer-Colonel D. Sheglov and Engineer P. Yakovlev definitely mentions a few things we have not yet seen, and puts a new twist on some old tricks.

"In battle with tanks or any other kind of forces, surprise is one of the main factors of success. It takes significant effort and skill in the art of concealment order to achieve surprise when the enemy is carefully attempting to deduce our aims through constant observation.

Every commander and soldier must keep in mind the stealth of his actions and correctly use already known means and techniques, as well as discover new ones.

Tanks can be found in many ways: due to light revealing their shadow or shining off their unpainted parts, due to track marks in soft terrain or bushes, due to broken or bent vegetation, due to fresh or tramped ground where the tanks turned or stopped. At night, their lights can be seen, their engines and tracks can be heard. The task of concealment is to hide these traits, or at least reduce their magnitude.

Concealment is split into natural and artificial. Natural concealment is achieved by hiding with natural means, trees, bushes, etc. One measure of natural concealment is keeping tanks in the forest, in the shadows of trees. When placing a tank underneath a tree, it is important to check that the shadow of the tank is covered by the shadow of the tree, otherwise an observer in an airplane can still see it (fig. 1).

Fig. 1. Incorrectly (left) and correctly (right)

Artificial concealment covers techniques of hiding a tank or an armoured car, consisting most importantly of camouflage paint and camouflage netting. It is important to know how to conceal tanks with any means that the unit has, since regularly issued materials might not be available in some cases, such as during an offensive. Improvised materials can always ensure that tanks are hidden, but remember that not all materials can be used in all terrain. For instance, covering your tank with tree branches when it is on a background of freshly dug dirt does not conceal the tank, but gives away its position. Similarly, a tank covered with straw on a grassy field will hide your tank, but a tank covered in straw on a ploughed field will only arouse suspicion. 

The so called T-net is a staple of camouflage. It is a 10 by 10 meter net that has square pieces of green fabric sewn to it, frequently in the middle, and less frequently around the edges (fig. 2).


The T-net is placed atop the tank and spread out with ropes. In order to make the shape irregular, you can use wooden stakes of various heights in two-three places underneath the net. In addition to the fabric squares, scatter branches and grass over the net.

In order to make the tanks less visible on terrain and to aid other concealment methods, use three kinds of paint: green, grayish-yellow, and dark brown in a disruptive pattern. At the factory, oil paint is used. In the field, painting is done with dry chalk.

When applying disruptive camouflage in the field, follow the following rules:
  1. Paint should be applied to all parts of the tank except the tracks.
  2. The main colour of the tank should be green, 50-60% of the surface. After that is yellow, 25-30%. Then dark brown, 15-20%.
  3. Paint spots should be variable in size and shape (fig. 3).

Temporary disruptive camouflage can be applied with dry coloured chalk. This chalk is made at the factory, and is meant to rapidly colour vehicles, equipment, and other materials.

When these regulation paints are missing, improvised paint can be used. Since they are made with water, they do not prevent the tank from rusting, so they may only be applied on top of painted metal.

The following materials can be used to make paint:
  • Dark brown paint: use crushed wood coals in combination with crushed brick. Dilute the powder with glue or casein. It is also possible to use natural or artificial varnish. This paint can also be made from filtered soil combined with varnish.
  • Earth gray: use filtered road dust or clay, diluted with water and glue. 
  • Green: use various plants (leaves, grass) burned with boiling water, then dried and crushed. Cover the tank with glue, varnish, tar, or bitumen, and sprinkle the powder where necessary. The best plants for this purpose are nettle, fern, and clover.
Disruptive camouflage can alter the tank's shape and reduce visibility on multicoloured terrain. There will be instances where the terrain is monochrome, and a single colour on your tank is preferable. In this case, paint all tanks in the colour of the background.

In open terrain, use T-nets, covering the net with improvised material. If no net is available, position the tanks according to terrain. For instance, on ploughed land, place the tanks parallel to the furrows. This method will make the tank less visible by changing the shape of its shadow, as it will fall on the dark and light parts of the furrow.

If the landscape is irregular and has many features, place the tanks in their shadows to hide them. Make sure the shadow of the tank does not peek out of the shadow of the terrain.

Try to move in unfavourable conditions for enemy aircraft: fog, low cloud cover, rain, night. When movement during the day is necessary, use the terrain to your advantage. The commander of the tank unit and his crews must examine the map or the terrain itself and determine the most covered routes: forests, bushes, ravines. On open terrain, the movement must be done in short marches from cover to cover one echelon at a time.

During movement, it is necessary to confuse the enemy. For instance, each tank group should travel on a different road. These methods should be used on open terrain, when the possibility of discovery is at its highest.

A good way to confuse the enemy is to leave an imitation of a base in an area that you have already left. In order to do this, use half-covered tank models, half-models, and flat cutouts (fig. 4).


When leaving your base, imitate movement in false directions. For this, one or two tanks should make a trail leading to a concealed area close by, and a fake tank should be left in this direction, pretending to have broken down or fallen behind. For added realism, put it by the side of the road in some light concealment, to imitate repairs. 

When moving on the open road in daylight, drive on the side of the road with shade, and cover the headlights with covers, paper, or rags so that they do not shine. 

When choosing a place to stop, pick an area in the forest or in bushes near the edge of a ravine. Burned villages are also very good places to stop. Put your tanks underneath trees near walls of buildings that are still standing or hide them among structures. Choose a location with the aim that the approach to it is covered and it can be driven to from the main road in places with trees or bushes. Hide your track marks.

Practice discipline, do not move or walk about unnecessarily. Never bunch up your tanks or place them in rows, as this will make your stop more noticeable. Good techniques still do not guarantee that your maneuver will remain a secret. Even the best hidden tank can be given away by its uncamouflaged tracks or movement of soldiers or groups, and cancels out good camouflage techniques and puts your unit at risk of enemy attack.

In practice, there were many cases where the enemy discovered our tanks only due to an ignorance of basic rules of concealment. For instance, one tank unit on an extended march remained hidden due to using concealment techniques, but one tank that was parked in sparse bushes without any additional means of concealment gave away the location of the unit, and it was attacked by bombers. It is necessary to remember that any violation, even a seemingly insignificant one, of camouflage rules will result in undesirable consequences."

Tuesday, 18 November 2014

German Experience in 1942

I have written many times that penetration achieved on paper is no match for penetration achieved in combat. The Germans seem to have been in agreement, issuing a document describing effective ranges from various weapons against T-34 and KV tanks on June 21st, 1942. A translated version of the captured order containing this data is stored in CAMD RF 208-2511-1049.

Type of gun
Type of shell
Range
Tank
Effect
Notes
50L/60 tank gun
PzGr. 39
600-700
T-34 (turret)
Penetration. Ammunition can explode and the tank can burn.
At long ranges, it is still possible to jam the turret and destroy the gun.
PzGr. 40
300-400
T-34 (turret)
Penetration only.
Same as above.
PzGr. 40
600-700
KV-2
Penetration.
The armour is about 80 mm thick. At longer ranges, the gun can be damaged.
50L/42 tank gun
PzGr. 40
Point blank
T-34
None.
It is possible to jam the turret or damage the gun.
75 mm gun (PzIV)
Hollow charge
Up to 700 m.
T-34 (turret)
Penetration.
Crew can be knocked out by the shockwave.
Hollow charge
Up to 2000 m.
T-34
Suppressive fire.

Hollow charge
Up to 800 m.
Type II (all parts)
Penetration.
Tank is easily ignited.
75L/43 tank gun
PzGr. 39
Up to 800 m.
T-34
Penetration of the front turret and hull.
Under favourable conditions, the side can be penetrated at 1200 meters.
PzGr. 39
Point blank
KV-1 (side)
Penetration.

Light field howitzer
PzGr. Rot
600
T-34
Damage to the gun.
23rd TD reports that the shell can be effectively fired from up to 1000 m. at tracks. Fire from reverse slopes.
PzGr. Rot
400
T-26
Penetration.

PzGr. Schwarz
300
T-26
The turret is destroyed.

105 mm leFH 18
PzGr. Rot
1200
KV-2
Front armour screen penetrated.

PzGr. Schwarz
1000
BT
Penetration

PzGr. Schwarz
1000
T-34
Penetration of the front hull.

50 mm Pak 38
PzGr .40
300
T-34 (turret)
Penetration
23rd TD reports effectiveness. At 800-1200 meters, the angle of meeting the sloped armour is more favourable.
PzGr. 38
300
T-34
Penetration

PzGr. 38
300
KV-1 and KV-2
Penetration of side and rear hull.
When shooting the rear at up to 1000 meters, there is a chance to set the tank on fire.

"The casing of PzGr. 40 frequently bursts, and the shell jams.

Rules of using AT guns: Fire from all weapons at proper distances. In cases of massed tank attacks, move the guns into the open. Against the T-34 tank, artillery fire must be concentrated, even if the armour cannot be penetrated with shells."

This document doesn't really tell us anything that we didn't know. The short 50 mm gun is ineffective at fighting T-34s, even with APCR. The longer gun of the same caliber is a little better, but only then against the turret, and not the hull (explaining the short life of up-armoured T-34s). APCR doesn't do as much damage to the insides as APHE. In this case, where the 50 mm APCR can penetrate the T-34's turret, it doesn't cause detonation of the ammunition like APHE does. 

It's interesting to note the obsession with the T-34. Heavier KV tanks are also present (as well as a drizzle of light tanks), but the T-34 receives greatest attention, with more rows dedicated to its destruction, plus additional instructions to fire even if it's ineffective.

The report contains descriptions of tactics I have already posted, along with some new points. For instance, they praise Soviet artillery.

"Enemy artillery has achieved successes in control and concentration of fire. There are cases of massed artillery fire. Because of this, we are forced to loosen our formations.

Reserve positions, ranging guns, and "migrating" guns are used skilfully. Artillery positions are masterfully camouflaged."

It is also noted that the amount and effectiveness of Soviet tank units has increased. In connection with this, tactics must be revised.

"Tanks must be constantly, up to the moment of the breakthrough, be supported by artillery fire (sometimes smoke). If possible, dive bombers must also be used.
...
It is necessary for tank units to occupy favourable positions (preferably reverse slopes), wait for enemy tanks, and then fire on them. These tactics bring greater success than excessive heroism demonstrated by frontline units."

And in the end, one little tidbit that will prove to be the curse of German vehicles for a few years to come: "There are many cases of breakdowns when they need to tow vehicles of equal or greater mass."

Thursday, 9 October 2014

Panzerfaust, Russian Style

CAMD RF 233-2356-775 contains a laconic and rather interesting phrase in a paragraph describing the actions of the 2nd Infantry Battalion of the 598th Infantry Regiment. It seems that Captain Kolchanov found his 45 mm guns and 76 mm regimental guns unsatisfactory, and decided to stock up on some heavier firepower. The document reads: "Against enemy Panzerfaust operators, the battalion successfully used singular M-31 mortar rounds, which were carried up to the second or third floor of a building and fired at the enemy positioned across the street."

Thankfully, a little extra digging reveals more details about this tactic.

"Experience of direct fire by rocket artillery in the streets of Berlin

In street battles, when a solid front line is gone and enemy units are often found in individual houses and crossroads, the use of traditional artillery is impossible. Rocket artillery units used M-13, M-31 and captured 280 mm rounds to fire directly without launchers.

Considering the caliber and destructive force of M-31 rockets, their use was an effective measure against enemy concentrations.

Rockets were used to destroy all or parts of houses that contained enemy concentrations or impeded progress. The conditions of city fighting allowed for transport and installation of rockets 30-100 meters from enemy forces in a house window or wall breach. Aiming was performed with a primitive aiming device.

The effectiveness of M-31 rockets is achieved due to the following:
  1. At short distances (30-100 meters), it is possible to hit a small target such as a smokestack, church cupola, window, or breach in a wall. Due to the destructive power of the rocket, the target is completely destroyed.
  2. Using rockets to fire directly at the last minute allows our forces to eliminate the enemy or clear a path before the enemy has a chance to commit mobile reserves. The sudden and complete destruction has a great effect on enemy morale.
One advantage of rockets over traditional artillery is that moving large caliber artillery into a direct fire position is impossible, and indirect fire introduces the danger of hitting your own forces, whereas low caliber artillery does not achieve the desired effect. Another advantage is the possibility of using many rockets at once to destroy several targets. 

Massed use of M-31 rockets results in powerful and effective fire support for infantry units in cities. The use of this method is possible when:
  1. There are concealed paths towards to front lines.
  2. The target is 30-150 meters away.
  3. The placement of rockets is done secretly and silently.
  4. Cooperation with infantry is carefully and correctly carried out.
When preparing for fire support, assault teams encountered difficulties with transporting the rockets. Due to the presence of enemy soldiers with Panzerfausts and submachineguns in our rear, as well as fires, trucks carrying the rockets were forced to stop 900-1000 meters away from the front lines. The 130 kg rockets had to be carried the rest of the way by hand. In some cases, additional breaches had to be made in house walls. In places where the path of the rockets crossed the street under fire, the rocket was placed in a box, a rope was tied to the box, and thrown across the street. Soldiers would run across one by one and then pull the box across after them. In order to protect the rocket from bullets and shrapnel, the front part was covered with bricks. 

When the rocket was put into firing position 15-30 meters from the enemy, absolute silence and stealth was required. When any noise or movement was detected, the enemy would fire upon the position with Panzerfausts.

Horizontal aiming was performed with a primitive sight, consisting of one nail in the front of the mount and two nails in the rear. Vertical aiming was performed by stacking bricks and wooden beams under the rear of the mount. The mount was stabilized with wire in different directions. This held the mount in place during the process of firing, which improved accuracy. 

Since the exhaust jet was hot and highly pressurized, all doors and windows behind the rocket were opened, and all flammable objects removed. In order to prevent accidents, the detonator was placed in the basement or a distant room. Wires were run on the floor along the walls, and held with heavy objects every 1-2 meters. 

The firing position was camouflaged during setup by field-expedient means, and was removed several seconds before opening fire."

And of course, pictures!

Firing an M-31 rocket directly,


Firing an M-31 rocket upwards.

Firing an M-31 rocket downwards.